We’ve all been there before.
The campaign goes live, and then you spot a typo.
Or worse, the wrong logo version. Or the colors are off-brand.
These aren’t mistakes of poor judgment, but rather the result of a proofing process that relies too heavily on scattered feedback, long email threads, and “looks good to me” approvals.
The fix isn’t more reviewers or more time spent proofing. It’s about ensuring coverage of common critical issues. Building a structured design proofing checklist that lives within your review and approval process. It’s about having a better system.
What Is a Design Proofing Checklist?
A design proofing checklist is a structured and specific set of criteria that approvers must consider before signing off on assets. Rather than just asking someone to “take a look”, you’re giving guidance on exactly what needs attention.
A checklist-driven design review keeps approvals consistent and accountable.
From ad agencies to print production, digital marketing to video editing workflows, the design proofing checklist is a useful tool for any team that cares about quality and consistency.
What Should a Design Proofing Checklist Include?
For teams working with any creative assets, a checklist should cover a wide range of creative output. From branding and identity to specs and legal compliance, there are many critical elements that should be verified before signing off on creative.
The checklist can be a combination of a creative brief and brand guidelines. Depending on the use-case, it can also include creative operation requirements for internal approvals.
Here are some examples of what might go into an effective design proofing checklist.
Brand & Identity
☑ Logo versioning
☑ Color codes
☑ Typography
☑ Brand voice
Content
☑ Spelling and grammar consistency
☑ Key messaging/USPs
☑ CTA accuracy
☑ Anchored links
☑ Barcodes or QR codes resolve
☑ Contact information
☑ Correct versioning
Layout & Specs
☑ Bleed and crop marks for prepress
☑ Resolution(s) and image quality
☑ File format
☑ Mobile layout
☑ Other platform-specific formats
Legal & Compliance
☑ Usage rights on imagery
☑ Regulatory language
☑ Copyright notices
☑ Legal disclaimers
And there’s so much more, depending on your use case, campaign or project, and most importantly, past experience, ensuring that the same mistake isn’t made twice.
How Checklists Improve Your Review Process
Having a proofing checklist integrated into your review and approval process improves outcomes across the board.
Consistent Process
Every reviewer or approver evaluates the same criteria, every time. No more guesswork about what “done” means.
Accountability
Required items are verified prior to approvals. This ensures reviewers don’t skip critical checks.
Fewer Revision Rounds
Issues are caught earlier, reducing back-and-forth and speeding up approvals.
Faster Onboarding
New reviewers and approvers gain better insight into what to look for. The checklist becomes built-in training, built on previous learnings.
Clear Audit Trail
To approve a file, reviewers have to go through a transparent checklist-based process.
The ReviewStudio Approach to Design Proofing Checklists
With the ReviewStudio checklists feature, teams can bring this entire process directly into the proofing workflow. Teams can build and enforce structured reviews without leaving the platform.
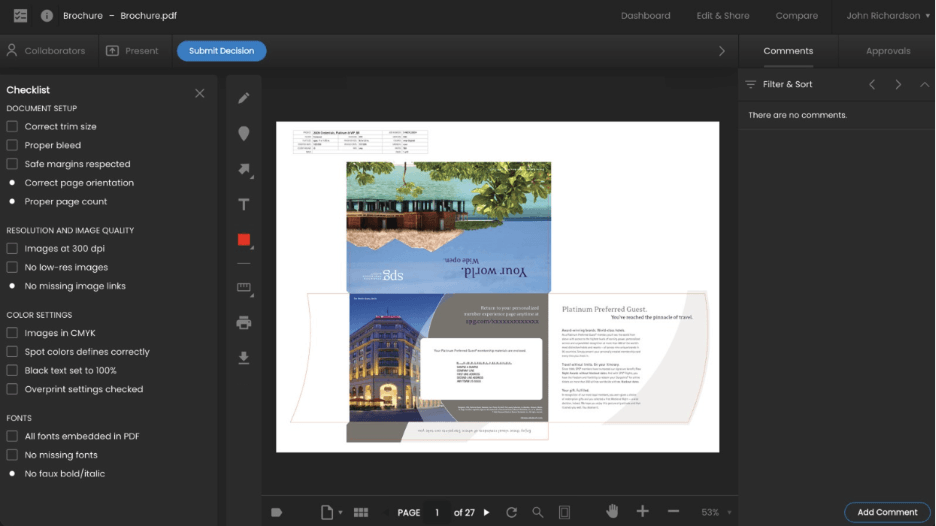
ReviewStudio checklists allow admins to create reusable checklists with sections and items that are either required or optional for approval of the creative.
Within the Review Canvas, approvers will see the checklist right in the sidebar. Each required item will need to be marked off by the person reviewing before giving an approval.
If something isn’t ready, approvers can request revisions. Progress in the checklist is saved automatically, allowing reviewers to pick up where they left off, and for reviewing to happen asynchronously.
This approach to the design proofing checklist helps teams deliver error-free, print-ready, and brand-aligned assets. It helps ensure that important details are not being missed or overlooked in the approval process.
How to Set Up Your First Checklist in ReviewStudio
Once you’ve registered your account, getting started with the ReviewStudio checklist features is simple:
- Go to Settings → Checklist
- Create a new checklist
- Add sections and items
- Define which items are required vs. optional
- Apply the checklist to a Review
That’s it! You’ve just added structure and accountability to your review process.
Tips for Building Effective Checklists
Especially when it comes to the detail-oriented intricacies or design proofing, a strong checklist is essential. To ensure things aren’t being overlooked or checklist items misinterpreted, make the list clear, specific, and practical. Here are a few tips:
- Keep it specific, simple and clear. For example, “Confirm primary blue is #3399ff” is more effective than “Check colors”.
- Create a library of checklists by content type or client (that can be tailored based on creative briefs if needed).
- Continuously add to and refine checklists after major projects to incorporate learnings.
- Gather input from all involved departments, such as legal, brand, operations, production and others, to ensure the checklist aligns with objectives.
The goal of your checklist shouldn’t be to create as long a list as possible; it’s to create one that is effective and reliable and keeps reviewers on track. And to never make the same mistake twice.
Stop Relying on Memory, Start Relying on Process
Great creative work deserves a great review process. A checklist offers your team the opportunity to slow down to move faster. If your team is moving fast without a system, it can lead to making avoidable mistakes.
A checklist gives teams accountability and confidence. It reduces costly mistakes, shortens review cycles, and ensures every asset meets your standards… before it goes live.